Difference between revisions of "Real Time Clock RTC"
(→Software) |
|||
| (11 intermediate revisions by the same user not shown) | |||
| Line 1: | Line 1: | ||
| − | Adding a RTC to the Hive Interface board. | + | Adding a RTC to the Hive Interface board version 0.3. (Skip the first section, Hardware, if using version 1.0 of the interface board as these modifications have been added to the board.) |
<gallery mode="packed" heights=200px> | <gallery mode="packed" heights=200px> | ||
File:DS3231.jpg|DS3231 RTC | File:DS3231.jpg|DS3231 RTC | ||
| − | File: | + | File:DS3231 on Pi.jpg|Installed on a Pi |
| + | File:DS3231-hive interface board 2c.jpg|Installed on Hive Interface Board | ||
</gallery> | </gallery> | ||
==DS3231== | ==DS3231== | ||
===Hardware=== | ===Hardware=== | ||
| − | + | [[File:DS3231-hive interface board 5c.jpg|400px|thumb|riht|alt Modified H2]] | |
| − | #The ground on | + | This module almost plugs in to H2 (the I2C bus) on version 0.3 of the Hive Interface board. A minor modification is required on version 0.3 interface boards. This modification was incorporated into later versions. As +5 VDC is not used and the ground must be shifted down a pin: |
| + | |||
| + | #The ground on C3 must be moved. | ||
#To be safe, the 4th pin of a 1x5 male header should be removed. | #To be safe, the 4th pin of a 1x5 male header should be removed. | ||
#Solder the 1x5 header in H2 BUT SHIFT IT DOWN ONE PIN. | #Solder the 1x5 header in H2 BUT SHIFT IT DOWN ONE PIN. | ||
| Line 16: | Line 19: | ||
{| class="wikitable" | {| class="wikitable" | ||
| − | ! scope="row" colspan="2"| H2 I2C Bus | + | ! scope="row" colspan="2"| Old H2 I2C Bus |
| + | ! scope="row" colspan="1"| New H2 for RTC | ||
|- | |- | ||
! scope="col"| Pin | ! scope="col"| Pin | ||
! scope="col"| Signal | ! scope="col"| Signal | ||
| − | ! scope="col"| New | + | ! scope="col"| New Pin |
|- | |- | ||
| 1 | | 1 | ||
| Line 48: | Line 52: | ||
===Software=== | ===Software=== | ||
| − | These instructions work | + | These instructions have recently been updated and work well: |
https://learn.adafruit.com/adding-a-real-time-clock-to-raspberry-pi/overview | https://learn.adafruit.com/adding-a-real-time-clock-to-raspberry-pi/overview | ||
| + | The hwclock is read on boot. When the ntp servers are available, the system time is synced to them and the system time is written to the hwclock every 11 minutes. From the hwclock man page: | ||
| + | Automatic Hardware Clock Synchronization By the Kernel | ||
| + | You should be aware of another way that the Hardware Clock is kept synchronized in some systems. The Linux kernel has a mode wherein it copies the System Time to the Hardware Clock every 11 minutes. This is a good mode to use when you are using something sophisticated like ntp to keep your System Time synchronized. (ntp is a way to keep your System Time synchronized either to a time server somewhere on the network or to a radio clock hooked up to your system. See RFC 1305). | ||
| + | |||
| + | This mode (we'll call it "11 minute mode") is off until something turns it on. The ntp daemon xntpd is one thing that turns it on. You can turn it off by running anything, including hwclock --hctosys, that sets the System Time the old fashioned way. | ||
| − | + | ====Turn on I2C==== | |
| − | + | =====Command Line===== | |
| − | |||
| − | |||
sudo raspi-config | sudo raspi-config | ||
| Line 66: | Line 73: | ||
and enable it. | and enable it. | ||
| + | =====Desktop===== | ||
| + | |||
| + | ====Install software==== | ||
sudo apt-get update | sudo apt-get update | ||
sudo apt-get install python-smbus i2c-tools | sudo apt-get install python-smbus i2c-tools | ||
| − | This wasn't necessary as they were both installed and latest version. | + | This wasn't necessary as they were both already installed and the latest version in the 0.7.4 image. |
Edit /boot/config.txt. Add: | Edit /boot/config.txt. Add: | ||
| Line 76: | Line 86: | ||
#enable RTC DS3231 module | #enable RTC DS3231 module | ||
dtoverlay=i2c-rtc,ds3231 | dtoverlay=i2c-rtc,ds3231 | ||
| + | |||
| + | |||
| + | Edit /lib/udev/hwclock-set and comment out these three lines: | ||
| + | #if [ -e /run/systemd/system ] ; then | ||
| + | # exit 0 | ||
| + | #fi | ||
Latest revision as of 18:46, 28 August 2018
Adding a RTC to the Hive Interface board version 0.3. (Skip the first section, Hardware, if using version 1.0 of the interface board as these modifications have been added to the board.)
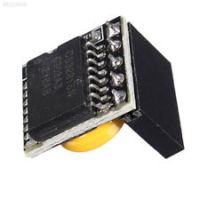
DS3231 RTC
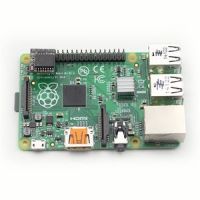
Installed on a Pi
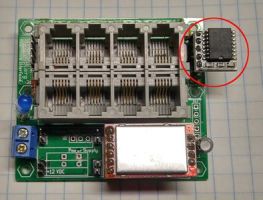
Installed on Hive Interface Board


Contents
DS3231
Hardware

This module almost plugs in to H2 (the I2C bus) on version 0.3 of the Hive Interface board. A minor modification is required on version 0.3 interface boards. This modification was incorporated into later versions. As +5 VDC is not used and the ground must be shifted down a pin:
- The ground on C3 must be moved.
- To be safe, the 4th pin of a 1x5 male header should be removed.
- Solder the 1x5 header in H2 BUT SHIFT IT DOWN ONE PIN.
| Old H2 I2C Bus | New H2 for RTC | |
|---|---|---|
| Pin | Signal | New Pin |
| 1 | +5 | No connect |
| 2 | +3.3 | Pin 1 of H2 |
| 3 | I2C | Pin 2 of H2 |
| 4 | I2C | Pin 3 of H2 |
| 5 | Ground | No connect |
| Ground for C | Ground | Pin 5 of H2 |
Software
These instructions have recently been updated and work well:
https://learn.adafruit.com/adding-a-real-time-clock-to-raspberry-pi/overview
The hwclock is read on boot. When the ntp servers are available, the system time is synced to them and the system time is written to the hwclock every 11 minutes. From the hwclock man page:
Automatic Hardware Clock Synchronization By the Kernel
 You  should be aware of another way that the Hardware Clock is kept synchronized in some systems.  The Linux kernel has a mode wherein it copies the System Time to the Hardware Clock every 11 minutes.  This is a good mode to use when you are using something sophisticated like ntp to keep your System Time  synchronized.  (ntp is a way to keep your System Time synchronized either to a time server somewhere on the network or to a radio clock hooked up to your system.  See RFC 1305).

 This mode (we'll call it "11 minute mode") is off until something turns it on.  The ntp daemon xntpd is one thing that turns it on.  You can turn it off by running anything, including hwclock --hctosys, that sets the System Time the old fashioned way.
Turn on I2C
Command Line
sudo raspi-config
Select
5 Interfacing Options
Select
P5 I2C
and enable it.
Desktop
Install software
sudo apt-get update
sudo apt-get install python-smbus i2c-tools
This wasn't necessary as they were both already installed and the latest version in the 0.7.4 image.
Edit /boot/config.txt. Add:
#enable RTC DS3231 module
dtoverlay=i2c-rtc,ds3231
Edit /lib/udev/hwclock-set and comment out these three lines:
#if [ -e /run/systemd/system ] ; then
# exit 0
#fi