Difference between revisions of "Manual: Model A"
(→Hive not reporting in) |
(→Procedure) |
||
| (33 intermediate revisions by the same user not shown) | |||
| Line 14: | Line 14: | ||
<div style="width:300px; text-align:left; color:black"> | <div style="width:300px; text-align:left; color:black"> | ||
| − | |||
| − | |||
| − | |||
| − | |||
| − | |||
| − | + | See the [[Solar Design|Model B Solar/Wifi Design]] for details. | |
</div> | </div> | ||
| | | | ||
[[File:SC004a.jpg|right|244x335px|thumb|SC004 Awendaw, South Carolina]] | [[File:SC004a.jpg|right|244x335px|thumb|SC004 Awendaw, South Carolina]] | ||
|} | |} | ||
| + | |||
==Quick Start== | ==Quick Start== | ||
| + | |||
[[File:Sc001-4a.jpg|right|thumb|400px|Model A frame and electronics.]] | [[File:Sc001-4a.jpg|right|thumb|400px|Model A frame and electronics.]] | ||
[[File:Sc001-5a.jpg|right|thumb|400px|Model A frame showing scale controller.]] | [[File:Sc001-5a.jpg|right|thumb|400px|Model A frame showing scale controller.]] | ||
| Line 100: | Line 97: | ||
#Plug the 4 pin round connector from the Weatherproof Electronics Enclosure into the connector in the bottom of the scale base. | #Plug the 4 pin round connector from the Weatherproof Electronics Enclosure into the connector in the bottom of the scale base. | ||
#Install 6 AA batteries in the battery holder inside the Weatherproof Electronics Enclosure. | #Install 6 AA batteries in the battery holder inside the Weatherproof Electronics Enclosure. | ||
| − | #Plug the ethernet cable from the Weatherproof Electronics Enclosure into the POE injector receptacle marked POWER+DATA OUT: | + | #Plug the ethernet cable from the Weatherproof Electronics Enclosure into the POE injector receptacle marked POWER+DATA OUT:[[File:Poe1.jpg|thumb|center|500px|POE Adapter]] |
#Plug a cable from the POE injector marked LAN IN to a router with DHCP enabled. | #Plug a cable from the POE injector marked LAN IN to a router with DHCP enabled. | ||
| − | #Plug the 48 volt DC power supply into the connector on the POE Injector marked DC | + | #Plug the 48 volt DC power supply into the connector on the POE Injector marked DC 48V. [[File:Poe2.jpg|thumb|500px|center|POE Adapter]] |
| + | |||
| + | |||
| + | ==Testing== | ||
| + | |||
| + | A. Determine the scale's IP. | ||
| + | |||
| + | #Log into the router. | ||
| + | #List the computers connected to the network. | ||
| + | #:SC00X IP: 192.168.2.10 | ||
| + | #Point browser to the ip. Should see graph. | ||
| + | |||
| + | Problems: Two routers. Best to plug into first (upstream) router. Leave firewall intact in second router and use it for your personal home network. | ||
==Hive Selection and Manipulation== | ==Hive Selection and Manipulation== | ||
| Line 110: | Line 119: | ||
=== Hive not reporting in=== | === Hive not reporting in=== | ||
#Make sure the internet is up. If not, reset the router. | #Make sure the internet is up. If not, reset the router. | ||
| − | #Reset the Pi | + | #Reset the Pi by cycling the power. Turn the unit off for about 20 seconds and turn unit back on. This may be easily done by unplugging the POE 48 VDC power supply from the wall or from the POE injector. |
| − | |||
| − | |||
| − | |||
| − | |||
| − | |||
| − | |||
| − | |||
| − | |||
| − | |||
| − | |||
| − | |||
| − | |||
| − | |||
| − | |||
| − | |||
| − | |||
| − | |||
| − | |||
| − | |||
| − | |||
| − | |||
| + | ===Still not working?=== | ||
| − | + | #Test the internet connection | |
| + | ##Unplug the POE power supply (48 VDC) from the POE injector. | ||
| + | ##Unplug the ethernet cable from the hive from the POE injector receptacle marked POWER+DATA OUT: | ||
| + | ##Plug a PC into the POWER+DATA OUT port on the injector. IMPORTANT: MAKE SURE YOU UNPLUG THE POE POWER SUPPLY | ||
| + | ##Boot the PC and make sure the internet is working. | ||
| + | ##:If the internet is not working, the problem is between the PC and the router. It could be a bad port in the router, a blown surge protector, a bad cable or POE injector. | ||
| + | ##:If the internet is working, continue with the next step. | ||
| + | # Check the hive computer | ||
| + | ##Open the weatherproof electronics enclosure. | ||
| + | ##With a flat blade screw driver remove the screws that hold the metal cover with the battery holder. Lay the cover on top of the lid.[[File:Sc001-1a.jpg|none|950px|frame|Model A electronics]] | ||
| + | ##:On the bottom right hand corner of the Raspberry Pi there are five LEDS near the USB connector.[[File:RasPiStatusLEDs.png|thumb|400px|right|Pi Status LEDs]] | ||
| + | ##:During normal operation: | ||
| + | ##:PWR light should be solid red. | ||
| + | ##:ACT should flash occasionally. | ||
| + | ##:LNK should be on and flash off occasionally. | ||
| + | ##Unplug the power cable from the POE splitter. | ||
| + | ##Wait 10 seconds and plug it back in. | ||
| + | ##:The red PW light should be solid red. | ||
| + | ##:The green ACT light should start flashing and the LNK light should come on as the Pi starts to boot. | ||
| + | ##:For the next twenty seconds the ACT light should flash on as the Pi boots up and the LNK light should be on and occasionally flash off. | ||
| + | ##If the Pi boots successfully then either the Pi has a bad ethernet port or the cable between the POE Injector (at the house) and the POE Splitter (at the hive). | ||
| − | |||
| − | |||
| − | |||
| − | |||
| − | |||
{| border="1" | {| border="1" | ||
|+ LED Status Indicators | |+ LED Status Indicators | ||
| Line 158: | Line 162: | ||
| 100 || yellow || 100 Mbps || on when 100 Mbps connection. Off when 10 Mbps (LAN) | | 100 || yellow || 100 Mbps || on when 100 Mbps connection. Off when 10 Mbps (LAN) | ||
|} | |} | ||
| + | |||
| + | ===No weight or weight is zero and doesn't change.=== | ||
| + | #Scale LCD is off or doesn't display correct weight. Is scale turned on? | ||
| + | #Scale won't stay on. | ||
| + | |||
| + | ===Scale displays correct weight but not showing up on website.=== | ||
| + | |||
| + | #Check scale parameters. | ||
| + | #Check DB-9 connector from USB hub (via USB to RS-232 converter cable) to scale. | ||
| + | |||
| + | ===Scale turns itself off within seconds of being turned on=== | ||
| + | |||
| + | We have observed this behavior before. We don't know why this happens. If you play with the scale long enough, it will probably start working. | ||
| + | |||
| + | First: Make sure the batteries are good. (If the AC power connector is not making good contact the batteries will go dead. There may only be enough juice in them to power the scale for less than a minute. There is a low battery indicator on the scale display. If the batteries are low, there is probably a problem with the scale power supply. | ||
| + | |||
| + | Second: Try disconnecting the yellow cable to the scale frame. The connector is on the bottom of the frame which is under the hive. And powering the scale up. If it turns on and stays on, then reconnect the yellow cable to the bottom of the scale frame. | ||
| + | |||
| + | Third: We suspect humidity. Try taking the electronics to a dry room and letting it dry out. | ||
| + | |||
| + | |||
| + | Make sure the POE splitter output voltage is set to 12 VDC. | ||
==Theory of Operation== | ==Theory of Operation== | ||
| Line 163: | Line 189: | ||
At the house, 120 VAC is converted to 48 VDC by the Power Over Ethernet (POE) power supply. The 48 VDC is combined with Ethernet from a router by the POE combiner. This combined power and ethernet signal is run to the yard with CAT-5 cable. It has a range of up to 100 meters. At the hive, the 48 VDC is split off from the ethernet signal and converted to 12 VDC. The 12 VDC powers the scale and is converted to 5 VDC to power the USB hub. | At the house, 120 VAC is converted to 48 VDC by the Power Over Ethernet (POE) power supply. The 48 VDC is combined with Ethernet from a router by the POE combiner. This combined power and ethernet signal is run to the yard with CAT-5 cable. It has a range of up to 100 meters. At the hive, the 48 VDC is split off from the ethernet signal and converted to 12 VDC. The 12 VDC powers the scale and is converted to 5 VDC to power the USB hub. | ||
| − | The hive computer is a Raspberry Pi Model B with 512 M RAM, 8 G SD, ethernet and 2 USB ports. Depending on the hub, | + | The hive computer is a Raspberry Pi Model B with 512 M RAM, 8 G SD, ethernet and 2 USB ports. The clock on the Pi is set and synced using National Time Protocol. Depending on the hub, the Pi is either back powered through the Pi's USB connector from the powered hub or powered from the hub using a USB Micro-B plug to Standard-A plug cable. The Pi communicates with the sensors though the USB hub. The Pi communicates with the scale at 9600 baud via a USB/RS-232 converter cable. |
Every five minutes the hive computer reads the scale, temperature and humidity sensors. The data is stored on the SD card (like a solid state hard drive) and is transmitted via the internet to a hosted web site, hivetool.net, where it is saved in a MySQL database. Graphing software displays graphs of weight temperature and humidity. | Every five minutes the hive computer reads the scale, temperature and humidity sensors. The data is stored on the SD card (like a solid state hard drive) and is transmitted via the internet to a hosted web site, hivetool.net, where it is saved in a MySQL database. Graphing software displays graphs of weight temperature and humidity. | ||
| − | Apache web server runs on the hive computer to display graphs and system statistics. This can be accessed from inside the LAN or from the internet | + | Apache web server runs on the hive computer to display graphs and system statistics. This can be accessed from inside the LAN or from the internet if port forwarding is enabled in the router. |
| + | |||
==Block Diagram== | ==Block Diagram== | ||
| Line 244: | Line 271: | ||
|19.95 | |19.95 | ||
|- | |- | ||
| − | |12 | + | |12 |
| − | | | + | |[[Media:TL-POE200 V2 Datasheet.pdf|TP-Link TL-POE200 Power over Ethernet Adapter]] |
| − | | | + | |Amazon |
| | | | ||
|- | |- | ||
| − | |13 | + | |13 |
| − | |[ | + | |[http://www.amazon.com/Belkin-Travel-Protector-Hidden-Swivel/dp/B0006OCFFS/ref=sr_1_19?ie=UTF8&qid=1374189795 Belkin Travel Surge Protector] (at router/POE injector) |
| + | |Amazon | ||
| + | |7.85 | ||
| + | |- | ||
| + | |14 | ||
| + | |[http://www.amazon.com/Ethernet-Protector-Gigabit-Thunder-1000mbs/dp/B00805VUD8 Ethernet Surge Protector] (at hive) | ||
|Amazon | |Amazon | ||
| − | | | + | |19.50 |
|- | |- | ||
|} | |} | ||
| + | |||
| + | ==Appendix 3. HX711 Modification== | ||
| + | [[File:HX711mod1.jpg|right|450px|thumb|Electronics with inner cover removed.]] | ||
| + | |||
| + | ===Purpose=== | ||
| + | Replace the Adam Equipment scale electronics with the HX711 board. | ||
| + | This eliminates the backup batteries, the problem with the scale zeroing on power failures, and the USB and RS-232 data connections. | ||
| + | The resolution is increased to .01 lbs from .1 lbs. The power requirement is cut in half. | ||
| + | |||
| + | ===Tools needed=== | ||
| + | #Nut driver. | ||
| + | #Wire cutter. | ||
| + | #Wire stripper. | ||
| + | #Small jewelers screw driver. | ||
| + | |||
| + | ===Procedure=== | ||
| + | [[File:HX711mod2.jpg|right|450px|thumb|Cut the four wires.]] | ||
| + | [[File:HX711mod3.jpg|right|450px|thumb|Attach four wires to HX711 board as shown.]] | ||
| + | [[File:Hx711_pi2.jpg|right|450px|thumb|Attach 2 connectors to Pi as shown.]] | ||
| + | # Disconnect power to the unit. | ||
| + | # Open the lid to the grey plastic electronics enclosure. | ||
| + | # Remove the 4 AA batteries. They are no longer needed. | ||
| + | # Remove the 4 screws that hold the black inner cover. Carefully lay the inner cover upside down on the lid of the grey box. | ||
| + | # Locate the yellow cable that runs to a small circuit board on the back of the battery holder. | ||
| + | # Cut the four wires in the yellow cable (brown, black, blue white) from the small circuit board on the back of the battery holder. | ||
| + | # Carefully strip about 3/16" insulation from each wire. | ||
| + | # Connect the four wires to the 6 position screw terminal strip on the HX711 circuit board. Make sure that all the strands of each wire all go into the terminal strip entry and cannot short to another wire. | ||
| + | # Plug the connectors from the HX711 board into J8 on the Pi. Make sure they are connected to the correct pin. See [[Interface_the_HX711_to_Pi#Method_1:_Connect_HX711_to_P1/J8]] for more details. | ||
Latest revision as of 04:02, 12 May 2015
|
Instruction Manual for the Model A POE Attention! See the Model B Solar/Wifi Design for details. |

Contents
Quick Start


A. Scale Setup
- Plug the 4 pin round connector (yellow cable) from the Weatherproof Electronics Enclosure into the connector in the bottom of the scale base.
- Install 6 AA batteries in the battery holder inside the Weatherproof Electronics Enclosure.
B. Power and LAN Connections
- Plug the surge protector into a 120 VAC wall outlet.
- Plug the POE Power Supply into the surge protector.
- Plug the cable from the POE Power Supply into the POE Injector input DC 48 V. The green light on the POE Injector should be on.
- Plug a CAT-5 cable from the router to the surge protector.
- Plug a CAT-5 cable from the surge protector to the POE Injector input LAN IN..
- Plug the CAT -5 cable from the hive electronics into the POE Injector output POWER+DATA OUT
C. Testing
- Figure out the scale's IP address
- Connect to the scale from inside the LAN
- See if it is hitting hivetool.org
D. Hive Selection and Management
- Select a medium strong, healthy colony
- Switch out a bad colony ASAP.
- Over Super. DO NOT LET THE COLONY RUN OUT OF EMPTY COMB.
- Manage this colony for extracted honey production.
Specifications
Hardware
- Raspberry Pi B computer with 8 GB SD cards.
- 20”x16” platform scale 440 lbs max. 0.1 lb resolution.
- Two thermometers/hygrometers (for inside and outside the hive).
- Ethernet
- 4 spare USB ports.
- Weatherproof enclosure.
- Surge suppressor.
- Power over Ethernet (PoE) 48 VDC power supply (120 VAC).
Software
- Linux operating system (wheezy-raspbian)
- Apache Web server
- Hivetool (available from github.com/hivetools)
The units that are shipped as part of the South Carolina Hive Instrumentation Project already have the software installed. For detailed instructions, see how to load software on the Pi
Requirements
Power
Power Requirements: 12 to 24 VDC 1 amp (Supplied by 120 VAC POE adapter)
NOTE: There are no hazardous voltages inside the platform scale or enclosure.
The electronics will operate from 12 to 24 VDC. The 120 VAC Power Over Ethernet (POE) adapter is a 48 volt DC wall power supply and an injector that sends the power over extra wires in the Ethernet cable. At the hive, a splitter separates the 48 VDC from the Ethernet cable and regulates the voltage to 12 VDC. The range is up to 100 meters.
Internet
An internet connection, usually DSL, cable or satellite, is required. A spare port on the router (Ethernet (10BASE-T or 100BASE-TX) is required. Very little bandwidth is used. Less than 1K bytes are uploaded every 5 minutes.
Scale Configuration
The scales that are shipped as part of the South Carolina Hive Instrumentation Project have been pre-configured. However, it may be necessary to configure the scale if the scale is replaced, this is a new system, or as an aid during trouble shooting. See Section Section 13 of the CPW200plus User Manual for detailed instructions.
With the scale off, hold the Tare/Zero button and press the On/Off button.
| Parameter | Setting | Rational |
|---|---|---|
| Auto Power Off | Pr oFF | Don't want the scale to turn off after a period of inactivity. |
| Backlight always off | bL 1 | Increases battery life when AC power fails. |
| Baudrate | 9600 | Default |
| 8 Bit no parity | PAr 1 | Default |
| Transmission Mode | trn 1 | Default. Can set to trn 2 during trouble shooting. |
Installation
Before installing, please test the unit by powering it up and connecting it to the internet.
- Plug the 4 pin round connector from the Weatherproof Electronics Enclosure into the connector in the bottom of the scale base.
- Install 6 AA batteries in the battery holder inside the Weatherproof Electronics Enclosure.
- Plug the ethernet cable from the Weatherproof Electronics Enclosure into the POE injector receptacle marked POWER+DATA OUT:
- Plug a cable from the POE injector marked LAN IN to a router with DHCP enabled.
- Plug the 48 volt DC power supply into the connector on the POE Injector marked DC 48V.


Testing
A. Determine the scale's IP.
- Log into the router.
- List the computers connected to the network.
- SC00X IP: 192.168.2.10
- Point browser to the ip. Should see graph.
Problems: Two routers. Best to plug into first (upstream) router. Leave firewall intact in second router and use it for your personal home network.
Hive Selection and Manipulation
These guidelines have been extracted from Protocol for Scale Hive Measurements of the Honey Bee Nectar Flow, HoneyBeeNet.gsfc.nasa.gov (This protocol was written for manual measurements made with mechanical scales instead of computerized automatic electronic scales.)
[Notes from a conversation with Dr. Esaisas at HoneyBeeNet: 1. NASA is currently interested in the performance of the environment, not the performance of individual hives. 2. Many beginners have reservations about moving hive location and losing foragers, or have never moved a hive before, or also want to see the hive record for a recovery from that swarm or multiple swarms. We need to overcome those somewhat legitimate concerns.]
A. Select a medium strong, healthy colony.
B. Switch out a bad colony ASAP.
C. Over Super. DO NOT LET THE COLONY RUN OUT OF EMPTY COMB.
D. Manage this colony for extracted honey production.
A. Select a medium strong, healthy colony. A medium strong, healthy colony is recommenced , as you especially want it to prosper, stay put, and not swarm. Use care in selecting the colony to put on the scale. A minimal pollination strength colony (6 frames of bees and brood) in two deeps or 3 mediums would be a good size colony. Resist the temptation to put your strongest colony on the scale in hopes of setting a new local record for daily gain, unless you are absolutely certain that it will not get into the swarmy mode as compared to the nectar collecting mode. If you are absolutely certain of this, please let the rest of us know how you figure that out!
A young marked queen, healthy abundant bees, and good equipment is best. You want a colony that you can manage confidently. You will be spending a good bit of effort making those measurements, and you do not want to risk losing the good data continuity (not to mention the honey) because it swarmed. (although this need not mean the end of the record – see Special Cases).
B. Switch out a bad colony ASAP. If (when) a colony goes bad, it is much much better to switch it out with a good queenright colony as soon as possible. The common misconception is that we are tracking colony performance, when actually we are trying to track the performance of the environment, and we need a good hive to do that.
C. Over Super. DO NOT LET THE COLONY RUN OUT OF EMPTY COMB.
Make sure you have an abundance of supers with empty drawn comb. I generally start with four at the end of March, and have increased to seven on one occasion. Lack of empty comb for nectar storage can put a major dent in nectar collection, and encourages swarming.
Over-supering, or providing more than sufficient drawn comb for nectar storage, is encouraged, because we do not want the colony to run out of room, and because empty comb encourages nectar foraging. We do not recommend that the scale colony be used for comb honey production for this reason. Although comb honey management would not necessarily preclude a useful record, it might reflect a slightly different nectar flow from an adjacent colony maintained with excess drawn comb. Also, the reduction of brood nest volume, or crowding, is a common management technique to encourage rapid comb building in comb honey supers, which also would perturb the weight record. Comb honey colonies tend to produce less total honey because of the required management needed to fill those beautiful frames with the highly saleable product. So, use another colony to make your comb honey.
D. Manage this colony for extracted honey production, in the manner to which you are accustomed.
You can perform all needed management manipulations like reversing brood chambers, feeding the colony syrup, grease patties, and pollen patties, etc. directly on the scale. You must just note the weight changes before and after such procedures. When you remove that empty syrup jar and protective hive body/box, or miller feeder, be sure to record that weight loss.
Feeding
The colony should have received stimulative feeding, (light syrup, and pollen patties if needed) and it may continue to receive stimulative feeding until the flow commences. For a details on different methods of feeding scale hives, see Feed adjustment of scale hive records.
Swarm Control
Inspect the colony weekly, briefly, for signs of swarm cells, and congestion. By briefly I mean one or two minutes or less, especially on good days, and with minimal smoke. Look for larvae, active queen cells with royal jelly, capped swarm cells, and empty comb. If it looks fine (no swarm cells, larvae, room in the supers), close up gently and get out.
Plan manipulations and swarm prevention procedures ahead of time. Your scale record will convince you that drastic or lengthy manipulations can have major impact on colony behavior for that entire day.
Swarm prevention procedures that have significant impact on nectar/pollen collection behavior should be avoided if possible, even if the impacts might be temporary. This includes re-queening during the nectar flow, temporary queen removal/caging, and the like. Removal of frames of bees and brood (not the queen), and substitution with foundation or drawn comb have minimal impact on collection, but you will want to weigh the collection of new items before you put them in, and weigh the removed items, and note the difference. Remember, our object is to try to keep the nectar foraging activities of the colony steady throughout the spring.
Several previous articles have recommended a “minimal management” approach for scale colonies (e.g. Burgett, 1987 Gleanings in Bee Culture 115, 694-697.) which included natural queen rearing, but maintaining extra supers at all times. Several of those were written before mites, and the rationale was to include the natural over-wintering and spring build-up of the colony as one of the environmental variables to be monitored, along with the weather, climate, and foraging conditions. The interest was on colony yield, and the condition of the colony was treated as a component of natural variability; the timing of the nectar flows was of secondary interest. This is not quite what we are doing here. Here, the idea is to have the colony of bees at roughly even strength from one week to the next, so that it can faithfully collect any available nectar in an amount that the scale can detect, and thereby record the timing of the nectar flows. This calls for keeping the colony healthy, queen-right, and strong.
Bottom or top supering is always a matter of opinion at gatherings of beekeepers. I exchange several new frames of comb with frames that are being worked to provide empty space next to the excluder. I use an excluder. When the first supers go on, the bottom-most super goes under the queen excluder until the queen lays in a frame or two. When this occurs, usually in a week or so, I find her and move her down into the brood chamber, and put the excluder between the brood chamber and that first super with larvae. The bees readily go up through the excluder to tend the brood, and the brood in that super will have emerged and been replaced with honey long before harvest time.
Special Cases
Swarm, Death of Queen, Disease
The most likely special case is that the queen dies, or the colony swarms, despite your best attempts, or the colony becomes mite ridden. For these conditions, the recommendation is to 1) note it in the log, then 2) switch the colony with a substitute colony from your apiary as soon as possible. Pick one which is in the nectar collecting mode if possible. Unless your apiary is extremely level everywhere, it may be easier to move the colony rather than the scale (but only if both colonies are healthy). During the day, with a friend if possible, record the weight, pick up the colony from the scale and move it adjacent to the replacement. If you and your friend are strong and have a hive mover this can be accomplished in a few minutes, otherwise you will have to break each down into more convenient units. Move the replacement onto the scale, record the weight. Then put the former scale colony onto the replacement stand. The change in weight is treated like a manipulation as above. Field bees will return to their former location, so the gain/loss will be suspect for a day or two (and for at least the week prior to swarming as well). The alternatives are to buy and install a new queen, or wait for the emergency or virgin queens to emerge, mate, and begin laying. That long delay results in a considerable period (10-30 day) hiatus in normal foraging, which will invalidate the record for following the nectar flow, likely for that spring. You need to decide what you want to do for the swarmed colony, but the quick substitution minimizes the impact to your scale record.
If you can't supply a substitute colony, then note it in the log, remove all cells, search for any virgins that may have already emerged, and get a new queen installed ASAP.
Hive Beards
When the colony is very strong, and the weather is very warm and humid, bees cluster on the "front porch" for relief. This is called a hive beard (not to be confused with the bee beard stunt), and is a sign that maybe you need to add a super. It also might mean that the bees hang down off the scale platform and are resting on the scale base, resulting in a low weight by a pound or so. You might want to encourage them to go in with a little smoke, and put a new super on the next day, but otherwise you can forget about it.
Bees under the bottom board, or under the scale.
I have had bees cluster under the screened bottom board, but above the scale platform. This was not a problem for weighing, but it tended to defeat the purpose of the screen since any mite that fell through had lots of bees to climb onto. I blocked the slit with a small piece of 8 mesh wire screen after blowing them out. On one occasion I had a swarm (not from the scale colony) elect to take up residence under the platform scale base, amidst all the scale works. I lost some days until I had time to clean it out and relocate the swarm. There is no good way to prevent this – the gaps between the platform and scale body, and under the cast iron body itself, are necessary for proper functioning.
Preparations for Harvesting
Over-supering will likely result in lots of partially filled frames of ripening nectar/honey once the flow ends, making a nice clean harvest difficult. We all like those colonies with 2-5 supers of fully capped honey, little to no burr comb between them, and the top brood box well stocked as well, but such will not be the case with the scale hive if you have done your job right. You are still well ahead of the normal bloke, however, because you have a scale hive. You can make life a little easier when you notice that gains are steadily decreasing and the flow is beginning to shut down. Now you can combine mostly filled frames into one super, brushing all the bees off, and put that super on a colony that has capped most frames and is making honey-filled burr comb in between them, and hope that it finishes the added frames off. Remember to leave lots of unfilled comb on the scale colony. You can even begin to crowd down your other colonies as well, now that you have a scale hive and can see that the flow is rapidly tapering off! See, all that effort has some practical benefit!
Harvesting
The only comment here is that you should leave a partially-filled but mostly empty super on the colony after you remove the crop. This is to provide adequate room for any potential summer flows.
Troubleshooting
Hive not reporting in
- Make sure the internet is up. If not, reset the router.
- Reset the Pi by cycling the power. Turn the unit off for about 20 seconds and turn unit back on. This may be easily done by unplugging the POE 48 VDC power supply from the wall or from the POE injector.
Still not working?
- Test the internet connection
- Unplug the POE power supply (48 VDC) from the POE injector.
- Unplug the ethernet cable from the hive from the POE injector receptacle marked POWER+DATA OUT:
- Plug a PC into the POWER+DATA OUT port on the injector. IMPORTANT: MAKE SURE YOU UNPLUG THE POE POWER SUPPLY
- Boot the PC and make sure the internet is working.
- If the internet is not working, the problem is between the PC and the router. It could be a bad port in the router, a blown surge protector, a bad cable or POE injector.
- If the internet is working, continue with the next step.
- Check the hive computer
- Open the weatherproof electronics enclosure.
- With a flat blade screw driver remove the screws that hold the metal cover with the battery holder. Lay the cover on top of the lid.
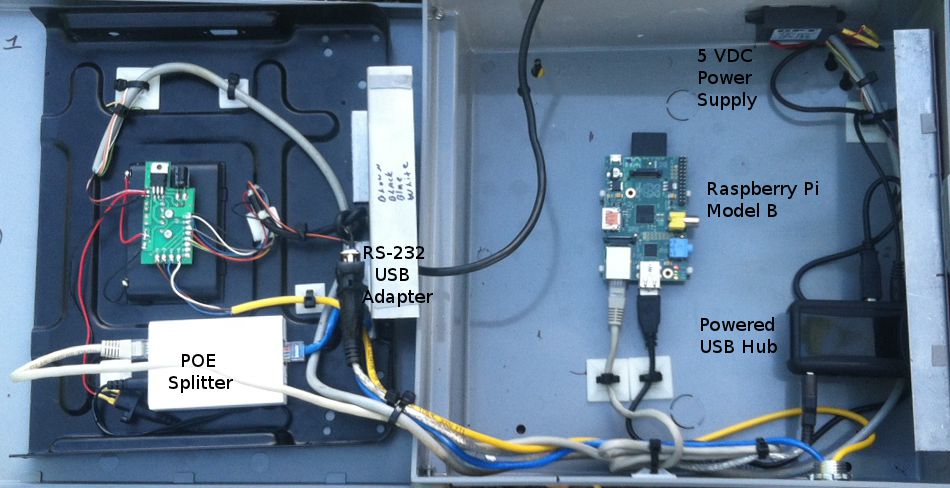 Model A electronics
- On the bottom right hand corner of the Raspberry Pi there are five LEDS near the USB connector.
- During normal operation:
- PWR light should be solid red.
- ACT should flash occasionally.
- LNK should be on and flash off occasionally.
- Unplug the power cable from the POE splitter.
- Wait 10 seconds and plug it back in.
- The red PW light should be solid red.
- The green ACT light should start flashing and the LNK light should come on as the Pi starts to boot.
- For the next twenty seconds the ACT light should flash on as the Pi boots up and the LNK light should be on and occasionally flash off.
- If the Pi boots successfully then either the Pi has a bad ethernet port or the cable between the POE Injector (at the house) and the POE Splitter (at the hive).


| LED | color | function | normal status |
|---|---|---|---|
| ACT | green | HD activity | SD card access |
| PWR | red | power | 3.3 V Power present |
| FDX | green | full duplex | on when full duplex Ethernet connection (LAN) |
| LNK | green | link | Link/Activity (LAN) |
| 100 | yellow | 100 Mbps | on when 100 Mbps connection. Off when 10 Mbps (LAN) |
No weight or weight is zero and doesn't change.
- Scale LCD is off or doesn't display correct weight. Is scale turned on?
- Scale won't stay on.
Scale displays correct weight but not showing up on website.
- Check scale parameters.
- Check DB-9 connector from USB hub (via USB to RS-232 converter cable) to scale.
Scale turns itself off within seconds of being turned on
We have observed this behavior before. We don't know why this happens. If you play with the scale long enough, it will probably start working.
First: Make sure the batteries are good. (If the AC power connector is not making good contact the batteries will go dead. There may only be enough juice in them to power the scale for less than a minute. There is a low battery indicator on the scale display. If the batteries are low, there is probably a problem with the scale power supply.
Second: Try disconnecting the yellow cable to the scale frame. The connector is on the bottom of the frame which is under the hive. And powering the scale up. If it turns on and stays on, then reconnect the yellow cable to the bottom of the scale frame.
Third: We suspect humidity. Try taking the electronics to a dry room and letting it dry out.
Make sure the POE splitter output voltage is set to 12 VDC.
Theory of Operation
At the house, 120 VAC is converted to 48 VDC by the Power Over Ethernet (POE) power supply. The 48 VDC is combined with Ethernet from a router by the POE combiner. This combined power and ethernet signal is run to the yard with CAT-5 cable. It has a range of up to 100 meters. At the hive, the 48 VDC is split off from the ethernet signal and converted to 12 VDC. The 12 VDC powers the scale and is converted to 5 VDC to power the USB hub.
The hive computer is a Raspberry Pi Model B with 512 M RAM, 8 G SD, ethernet and 2 USB ports. The clock on the Pi is set and synced using National Time Protocol. Depending on the hub, the Pi is either back powered through the Pi's USB connector from the powered hub or powered from the hub using a USB Micro-B plug to Standard-A plug cable. The Pi communicates with the sensors though the USB hub. The Pi communicates with the scale at 9600 baud via a USB/RS-232 converter cable.
Every five minutes the hive computer reads the scale, temperature and humidity sensors. The data is stored on the SD card (like a solid state hard drive) and is transmitted via the internet to a hosted web site, hivetool.net, where it is saved in a MySQL database. Graphing software displays graphs of weight temperature and humidity.
Apache web server runs on the hive computer to display graphs and system statistics. This can be accessed from inside the LAN or from the internet if port forwarding is enabled in the router.
Block Diagram

Appendix I. Packing List
- surge suppressor
- POE power supply
- POE injector
- 2 TEMPerHUM
- 2 USB extension cables (6 foot)
- 6 AA batteries
- Scale Frame
- Control Box
- CAT 5 cable patch cord POE - Surge suppressor
- CAT 5 cable patch cord Surge suppressor to router
- CAT 5 300 foot max
Appendix 2. Control Box/Frame Parts List
| Item | Manufacturer Model | Vendor | Price |
| 1 | Adam Equipment CPWplus200 | ||
| 2 | Raspberry Pi Model B | Newark Electronics | 35.00 |
| 3 | Kingston Flash Memory Card 8 GB Class 4 SDHC SD4/8GB | Amazon | 5.89 |
| 4 | RDing TEMPerHUM PC Sensor | ||
| 5 | 7 Port Powered USB Hub | Amazon | 9.95 |
| 6 | Prolific PL2303HX Rev D Chipset RS-232 to USB cable Plugable Technologies | Amazon | 12.95 |
| 7 | 6 AA Rechargeable batteries | ||
| 8 | DB-9 Female Connector | ||
| 9 | 12-24 VDC to 5 VDC converter | ProDCtoDC | |
| 10 | 4 conductor connectors #2400 and #2398 | Universal Radio Inc | 3.95 |
| 11 | Weatherproof enclosure | 19.95 | |
| 12 | TP-Link TL-POE200 Power over Ethernet Adapter | Amazon | |
| 13 | Belkin Travel Surge Protector (at router/POE injector) | Amazon | 7.85 |
| 14 | Ethernet Surge Protector (at hive) | Amazon | 19.50 |
Appendix 3. HX711 Modification

Purpose
Replace the Adam Equipment scale electronics with the HX711 board. This eliminates the backup batteries, the problem with the scale zeroing on power failures, and the USB and RS-232 data connections. The resolution is increased to .01 lbs from .1 lbs. The power requirement is cut in half.
Tools needed
- Nut driver.
- Wire cutter.
- Wire stripper.
- Small jewelers screw driver.
Procedure


- Disconnect power to the unit.
- Open the lid to the grey plastic electronics enclosure.
- Remove the 4 AA batteries. They are no longer needed.
- Remove the 4 screws that hold the black inner cover. Carefully lay the inner cover upside down on the lid of the grey box.
- Locate the yellow cable that runs to a small circuit board on the back of the battery holder.
- Cut the four wires in the yellow cable (brown, black, blue white) from the small circuit board on the back of the battery holder.
- Carefully strip about 3/16" insulation from each wire.
- Connect the four wires to the 6 position screw terminal strip on the HX711 circuit board. Make sure that all the strands of each wire all go into the terminal strip entry and cannot short to another wire.
- Plug the connectors from the HX711 board into J8 on the Pi. Make sure they are connected to the correct pin. See Interface_the_HX711_to_Pi#Method_1:_Connect_HX711_to_P1/J8 for more details.